Monday 12 November 2018

Attach additional event listener to out of the box SharePoint ribbon control

Have you ever had a use case where you must do something additional when an out of the box ribbon control is clicked, like "Open With Explorer" or "Export to Excel"? Maybe not, until now?
What could make this use case valid is the fact that the ribbon is slowly being phased out and it is no longer available in the modern experience, in addition not all features available in the ribbon are supported by all browsers and clients.
Having something additional being executed when a button from the ribbon is clicked can help you collect usage data for this features and better plan the move to modern experience or (like it or not) making Edge default browser, which does not support "Open with Explorer".
I am not aware of any other way to collect this information in SharePoint on-prem or Online.
Here is an example script that can be added as Scriptlink user custom action and it will attach additional click event listener on the "Open With Explorer" button. Everything that the function will do is to log the action, user name and the document library title in the console, but you can do whatever you find for useful, like logging it in the ULS or calling an API that will record the event.
I have tested it in SharePoint 2016 but it should work in SharePoint 2013 and SharePoint Online classic experience lists, it requires JQuery.


The Script:

Monday 23 April 2018

Closing, Opening and Unlocking SharePoint site collections

The way to implement some sort of site collection life cycle in SharePoint Server and the classic SharePoint Online sites is the Site Policy.
With the site policy you can set when to close the site and what time to wait after closure and delete it.
Closing and Opening of site can be done very easily using server or client side code if the site already has policy assigned.
Below is an example server side powershell code for closing and opening site collections. Note that the code should be executed within elevated privilege context.


Add-PSSnapin *sh*
 
## Close Site Collection
[Microsoft.SharePoint.SPSecurity]::RunWithElevatedPrivileges(
 {
  $spSite = Get-SPSite http://portal.azdev.l/sites/TestSite/
            
  [Microsoft.Office.RecordsManagement.InformationPolicy.ProjectPolicy]::`
   CloseProject($spSite.OpenWeb())
 }
)
 
## Open Site Collection
[Microsoft.SharePoint.SPSecurity]::RunWithElevatedPrivileges(
 {
  $spSite = Get-SPSite http://portal.azdev.l/sites/TestSite/
            
  [Microsoft.Office.RecordsManagement.InformationPolicy.ProjectPolicy]::`
   OpenProject($spSite.OpenWeb())
 }
)


Reopening the site will also update the "Project Expiration date". This is the date when the site will be deleted according to the applied site policy.
You might need to reopen a site if for example you need to do some administrative task over the site collection like disabling feature, removing event receiver or something similar.
However, changing the deletion date might not be acceptable.
When a site is closed a special read-only lock is applied. If you check in the Central Administration you will see below.

Archived Site
If you have to do change in couple of closed sites, you can remove the lock from the Central Administration UI. Doing this for hundreds or thousand of closed sites will not be very practical.
The issue is that doing below command will not unlock the site if it was closed by site policy or using the ProjectPolicy class.


Set-SPSite -Identity http://portal.contoso.net/sites/TestSite -LockState Unlock


The key thing to notice on the picture above is the term "Archived". The SPSite object has Archived Boolean property, if it is true the site is "archived" and read-only, if false and there is no other lock type applied, the site will be read-write. You can just change the value of that property with PowerShell, setting the value to false will not alter the project expiration date.


$spSite = Get-SPSite http://portal.contoso.net/sites/TestSite 
## Unlock the site
$spSite.Archived = $false
 
## DO YOUR THING
 
## Lock back the site
$spSite.Archived = $true


There is no client side analog that I am aware of. I hope it was helpful!

Monday 26 March 2018

Build trust for federated search between two SharePoint Server farms

Federated search is when you aim to receive search result from separate SharePoint (on-premises) by performing a search query in a separate on-premise SharePoint farm.
If you have done such configuration probably you have seen the official documentation for setting it up. This procedure will work in most of the cases.
However, this will not work if you do not have outbound connectivity from the remote farm that will receive the search query (ReceivingFarm) to the farm that is sending the query (SendingFarm).
In that case the federated search will be possible as long as the SendingFarm can access the ReceivingFarm, vice versa is not required, but you should take a bit different approach when building the trust since the SendingFarm web app metadata end point will not be available.
The first thing that needs to be done is to export the root and the token signing certificates from the SendingFarm and also get the Issuer Name (NameIdentifier) of the SendingFarm STS .

## Export Root Certificate
$rootCert = (Get-SPCertificateAuthority).RootCertificate
$rootCert.Export("Cert") | Set-Content "C:\SendingFarmRoot.cer" -Encoding byte
 
## Export Signing Certificate
$stsCert = (Get-SPSecurityTokenServiceConfig).LocalLoginProvider.SigningCertificate
$stsCert.Export("Cert") | Set-Content "C:\SendingFarmSTS.cer" -Encoding byte
 
## Get the STS Issuer Name
$issuerName = (Get-SPSecurityTokenServiceConfig).NameIdentifier

The difference from the official procedure will be how we are going to create the trusted token issuer and the trusted root authority in the ReceivingFarm, this is step 3 in the official procedure.
First copy the SendingFarm certificated to the ReceivingFarm.
Having above done you can create the trusted security token issuer and the trusted root authority  in the ReceivingFarm.

## Read SendingFarm Signing certificate
$stsCert = Get-PfxCertificate "C:\Install\Certs\SendingFarmSTS.cer"
## Read SendingFarm root certificate
$rootCert = Get-PfxCertificate "C:\Install\Certs\SendingFarmRoot.cer"
# Create a trusted security token issuer
$i = New-SPTrustedSecurityTokenIssuer -Name "SendingFarm" `
                                      -Certificate $stsCert `
                                      -IsTrustBroker:$false `
                                      -RegisteredIssuerName "<SendingFarm IssuerName>"
 
# Configure trust of the token-signing certificate'
# by adding the trust used to sign oAuth tokens'
# to the list of trusted root authorities'
# in ReceivingFarm
New-SPTrustedRootAuthority -Name "SendingFarm" `
                           -Certificate $rootCert


Now, you can continue with the trust configuration as it is described in the documentation.

I hope you found this helpful!

Friday 19 January 2018

Search result security trimming for File Share content source with ADFS users

Indexing of file shares is a common requirement if you have  legacy file share that hasn't been migrated to SharePoint or you are using file share for archiving purposes. SharePoint Search can provide this functionality.
SharePoint also support search result trimming for file share content. That means that if the user does not have permission to a certain content on the file share, the user will not see the content appearing in the search results.
If you are using Windows integrated authentication the security trimming does not require anything special, it will just work. This is not the case if your users are using ADFS to authenticate against SharePoint. If you are using ADFS it is mandatory to have two more claims in order to make the security trimming working.
Those claims are Primary SID and Primary Group SID. In some articles you can find that the Primary SID is required in S2S authentication scenario, but nothing about the Primary Group SID. The Primary SID is the User object SID and the Primary Group SID is the SID of the Domain's primary group
In this post I will demonstrate how to setup it up in ADFS and SharePoint. I have tested it with ADFS 4.0 and SharePoint Server 2016.

On the ADFS side you will need to create two Issuance Transformation rules using template "Pass Through or Filter an Incoming Claim".
You can use below rules to append your rule file and import it to your SharePoint Relying Party Trust(s).
But first, you will have to export your current rules by using below command.


$sprp = Get-AdfsRelyingPartyTrust -Name "<SharePointRP_Name>"
$sprp.IssuanceTransformRules | Out-File "C:\IssuanceTransformRules.txt"


Append the file with below rules for Primary SID and Primary Group SID or any additional rules you might want.


@RuleTemplate = "PassThroughClaims"
@RuleName = "Pass Primary Group SID"
c:[Type == "http://schemas.microsoft.com/ws/2008/06/identity/claims/primarygroupsid"]
 => issue(claim = c);
 
@RuleTemplate = "PassThroughClaims"
@RuleName = "Pass Primary SID"
c:[Type == "http://schemas.microsoft.com/ws/2008/06/identity/claims/primarysid"]
 => issue(claim = c);


Now, import  the file containing your old and newly added rules.


Set-AdfsRelyingPartyTrust -TargetName "<SharePointRP_Name>"`
 -IssuanceTransformRulesFile "C:\IssuanceTransformRules.txt"


On the SharePoint side you will have to create the claim type mappings for the two new claims. You can use the example script below.


Add-PSSnapin *SH*
 
$sts = Get-SPTrustedIdentityTokenIssuer
 
$sts.ClaimTypes.Add("http://schemas.microsoft.com/ws/2008/06/identity/claims/primarygroupsid")
$sts.ClaimTypes.Add("http://schemas.microsoft.com/ws/2008/06/identity/claims/primarysid")
 
$sts.Update()
 
$map = New-SPClaimTypeMapping `
-IncomingClaimType  "http://schemas.microsoft.com/ws/2008/06/identity/claims/primarygroupsid" `
-IncomingClaimTypeDisplayName  "Primary group SID" -SameAsIncoming
$map2 = New-SPClaimTypeMapping `
-IncomingClaimType "http://schemas.microsoft.com/ws/2008/06/identity/claims/primarysid" `
-IncomingClaimTypeDisplayName "Primary SID" -SameAsIncoming
 
Add-SPClaimTypeMapping -Identity $map -TrustedIdentityTokenIssuer $sts
Add-SPClaimTypeMapping -Identity $map2 -TrustedIdentityTokenIssuer $sts


And that's is all you need to do. If everything is fine you will see values for the two new claims and the security trimming should work for the ADFS users.


If you are wondering how to see the claims, I am using one of the many SharePoint Claims Viewer web parts found on the internet. I am also using LDAPCP for claims provider. Above requirement and scripts will be the same if you are using the OOTB claims provider.
I hope you found it helpful!

Tuesday 2 January 2018

Change Site Policy Deletion notification email template in SharePoint

The Site Policies in SharePoint are information management tool that helps you implement some site life cycle management. Whether this is dictated by internal house keeping rules or some external regulations that apply to your organisation, the Site Policy is the out of the box way to go if you want to "close" a site, delete it or both, automaticaly after certain period of time.
With site policies you have the option to notify the site owners in advance before the site is deleted. The mail looks like the one below.

Site Deletion Notice

The information in this email might not be suitable for your organization.
Fortunately there is a way to change the default Site Policy notification email body template and the email subject. This is not done in some XML template file like the Alerts template, maybe there is one, but I have not found it. There is SSOM and CSOM API that you can use to set custom email body template per policy.
The documentation of this is very poor and the best resource on this is the article Site Policy in SharePoint.
Unfortunately I have not managed to make this work server side or using PowerShell. I have tried with SharePoint 2013, SharePoint 2016 and SharePoint Online ssom and csom as well.
The only way I found it working is from console application using the CSOM approach.
The site policy post above is good and the code should work as it is, but it has some gaps.
There are three placeholders that we can use, placeholders for Site Url, Deletion Date and Mailbox Id.
However the placeholders with curly braces that are demonstrated in the post will not work.
I would like to save you some time testing especially if you are targeting SharePoint Online, as there you cannot manually run the "Expiration Policy" timer job.

The correct placeholders are below, without curly braces or any spaces.

SiteUrl: <!--SiteUrl-->
Deletion Date: <!--SiteDeleteDate-->
Mailbox ID: <!--TeamMailboxID-->


I hope you found this helpful!

Tuesday 19 December 2017

Site collection app catalog available in SharePoint Online

The site collection app catalog is now generally available for all tenants in SharePoint Online.
 It allows you to make SharePoint Add-Ins and SPFx solutions available only in certain site collections. This is a great improvements because it allows more flexible deployment options, you can test a solutions only on site collection level before pushing it to the entire tenant and it can decentralize the management of add-ins and SPFx packages.
You can create Site Collection App catalog by using SharePoint Online Management Shell.
Note that you will still need to configure tenant app catalog. If you try to provision site collection app catalog without tenant app catalog you will get below exception.

Add-SPOSiteCollectionAppCatalog : Cannot invoke method or retrieve property from null object. Object returned by the
following call stack is null. "TenantAppCatalog
RootWeb
GetSiteByUrl
new Microsoft.Online.SharePoint.TenantAdministration.Tenant()


For more information on site collection app catalog check out below PnP Webcast:


Sunday 17 December 2017

Fantastic 40 is back in SPFx form

Well, actually not, but I hope that the title of this post will make you want to check it out.
I would like to share a great project called "SPFx Fantastic 40 Web Parts". Except the name, this project has almost nothing to do with the old "Fantastic 40 Application Templates for SharePoint (WSS & MOSS)" because it is a collection of 40 SPFx Client Side Web Parts. It is open source project so you can use it as you find for useful. It was created by Olivier Carpentier, but the code is provided "as is" without support from Microsoft.
I am so excited because the web parts look great and they might be a solution to common needs that the out of the box modern webparts don't fulfill.
It is also a great learning resource and demonstration of what can be done with SPFx.
If it is not an issue for you to consume the web parts assets from CDNs you do not control you can download and deploy the *.sppkg as it is and it will work. I also tried most of the web parts on SharePoint Server 2016 with classic pages and they work and look great.
The web parts are grouped in seven categories and below you can find some samples.

Menu & Carousels & News Management: News Slider

The News Slider Web Part renders a simple news slider carousel to your page. You can manage your active news, manage the layout and easily render a cool slider to enhance your pages.


Social Tools: Tweets Feed

The Tweets Feed Web Part is a SharePoint client side web part built with the SharePoint Framework (SPFx). This web part generates a Twitter Feed on the page, based on the specified account. This Web Part uses the Twitter API to integrate the timeline.


Maps, Charts & Graphs: Bar Chart

The Bar Chart Web Part is a SharePoint client side web part built with the SharePoint Framework (SPFx). This web part insert a Bar Chart in your pages, and you can manage the bar chart settings as items, color, title, legends, etc. This web part uses chart.js lib.


Images Galleries & Tools: Grid Gallery

The grid gallery Web Part renders a pictures slideshow with grid of thumbnails. This web part implements unitegallery.js (a popular jquery script) as a client side web part for SharePoint.


Video & Audio: Media Player

The Media Player Web Part is a SharePoint client side web part built with the SharePoint Framework (SPFx). With it, you can insert a video in your pages that is a HTML 5 compatible video or audio files, a YouTube video or a Vimeo video. This web part uses Plyr.js lib.


Text Tools: Tabs

The Tabs Web Part is a SharePoint client side web part built with the SharePoint Framework (SPFx). This web part helps to create a tab (you manage, add, delete, edit or move a tab dynamically) and the web part editor can easily modify the tabs content thanks a HTML editor (WYSIWYG). This tab control is responsive, so the layout will adapt the render with the screen size.


Tools: Stock Info

The Stock Info Web Part is a SharePoint client side web part built with the SharePoint Framework (SPFx). This web part generates a stock graph picture for a specified stock. This web part uses the Yahoo Financial service.


Saturday 19 August 2017

Build TreeView with XML data in PowerShell [Tip]

In one of my recent scripts I worked on, I had to visualize XML data in a tree view manor.
I achieved this by using the TreeView Windows Forms control and I think that the result is good and can be used as an example if you have to do something similar.
I tweaked the function and made it a standalone "XML Browser" script that is visualizing the XML document and if you double click on the element you will copy the Outer XML text to the clipboard.

PowerShell XML Browser

In order to visualize xml you need to supply the path to it and the starting element. On the screenshot above I have a web.config file loaded and the starting element I want to visualize is "configuration". You can find the code and the example below. I hope you find it helpful!


Thursday 6 April 2017

Nintex Workflow UDA Usage report script

Yesterday I worked with a client that have many Nintex workflow published with heavy usage of UDAs(User Defined Actions). I wanted to get a detailed report on the UDA usage. Unfortunately I am not aware of any  out of the box Nintex tool that can do that. The Analyze button can give you some information, but you need to click on the workflow to find out where it is located, you need to be in the scope where the UDA is published, you can get information for one UDA at a time and the information is not really "exportable".
This is why I created a powershell script that will give you information for the UDA usage across the farm on all levels. It will give you useful information like UDA Name, Workflow Name, Defined At, List, Web, Site, WebApplication, WorkflowType, Author, UDA Version Used, Workflow Id.
There are two "modes" of the script, the default will give you just the GUIDs of the list,web,site and the web apps. If you want to get the name of the list and the URLs you need to use the second mode that will require more time to complete but will give you nice looking URLs instead GUIDs. If you want to get the URLs just use switch parameter GetUrls. The result can be saved in CSV format or it can be outputted in powershell. If you give value for CSVPath the Grid View will open at the end to visualize the data. The main source of information is the Nintex Configuration database and you can use the script with SQL authentication if you have an account with enough permissions and your SQL supports it.
I have tested the script with SharePoint 2016,2013 and 2010 and the oldest Nintex Workflow version I tested was 2.3.7.0.
You can see the code and the output examples below. I hope you find it useful!

Output with URLs retrieved:
Nintex Workflow UDA Usage report with URLs

Quick output with GUIDs:
Nintex Workflow UDA Usage report with GUIDs

Friday 24 March 2017

Troubleshoot PowerShell Add-Type Load Error [Tip]

In the last couple of days I am working with a client that has a DMS solution based on SharePoint Server 2010. We inherited the solution so it has it's specifics. One of those little things (that make life exciting) is that they have fields with custom data types. 
I had to do a powershell script that will edit some document metadata. I had to update standard SharePoint native data type fields, but after updating the item in powershell I lost the values of the custom data type fields. I realized that I need the custom data type loaded in the powershell session. So I started to import some DLLs, in the order that I thought it makes sense as we do not have the source code of the solutions.This was fine until I received the error below:

Add-Type : Unable to load one or more of the requested types. Retrieve the LoaderExceptions property for more information.

This error is completely generic and the only useful thing is that it tells us where we can find more useful information.
This simple error handling script turned out to be life saver for me as it showed exactly what the load error is and which dependent assembly I need to load first :)


The nice blue text is our LoaderExceptions property of the exception. I hope that you find it useful!
LoaderExceptions Powershell

Sunday 22 January 2017

Conditionally Show/Hide and Require SharePoint fields with JavaScript

In my last project I worked on DMS system based on SharePoint Server 2016 and had a very common requirement for the document forms. The requirement was to have Document Status field, Approval Reason and Rejected Reason fields. It is logical to want to hide Approval Reason when the document status is Rejected or Rejected Reason when the document is Approved.The client also wanted to make the fields required when the corresponding document status is selected. 
All customizations were going to be deployed using the classic way, with farm solution. I also had Nintex Forms, but I was unable to use it in this case due to other technical constraints.
That's why I decided to solve this requirement using JQuery and JavaScript script that are deployed with the WSP solution and included in the mater page.
The end result was pretty good and this is why I decided to share the script and a way to safely deploy it in SharePoint Online without the need to edit the master page or the list forms. The script is really simple and can be used/deployed as it is or with minor changes by person with moderate JavaScript experience.
Few notes on the SPO environment that was used. There are 3 custom site columns with following Title, InternalNames and Type: 
- Title: Document Status, InternalName: DocumentStatus, Choice, radio buttons
- Title: Approval Reason, InternalName: ApprovalReason, Multi-line text, Not required by definition
- Title: Rejected Reason, InternalName: RejectedReason, Multi-line text, Not required by definition

You can see the script below:

There are two main functions, showOrHideFields that will be started when the page is loaded and will show or hide Approval Reason or Rejected Reason field depending on the value of the Document Status field in New,View and Edit forms. The second function is with the specific name PreSaveAction, it will be launched when Check In or Save button is clicked and will not allow the form to be saved if Approval Reason or Rejected Reason fields are empty and will pop-out an "error" message below the field, again depending on the Document Status field value.
Below you can see how the form looks like in New,Edit and View mode.

New, Edit and View forms

In order to deploy the script without modifying the forms or the master page we are going to use the SharePoint PnP PowerShell module for SharePoint Online. In order to "inject" the javascript links we are going to use Add-PnPJavaScriptLink command. In the example below I am uploading the JS file, adding ScriptLink to it and adding ScriptLink to Google hosted JQuery library.


Add-PnPFile -Path "C:\Users\Ivan\Documents\ShowHide.js" -Folder "Style Library/scripts/" `
    -Checkout -Publish -CheckInComment ""
 
Add-PnPJavaScriptLink -Name JQuery `
    -Url "https://ajax.googleapis.com/ajax/libs/jquery/3.1.1/jquery.min.js"
 
Add-PnPJavaScriptLink -Name ShowHide `
    -Url "https://mod44444.sharepoint.com/Style%20Library/scripts/ShowHide.js"


Once the commands are executed the scripts will be loaded in all classic pages in the web(default scope for this command).
Unfortunately this really useful way of injecting JavaScript will not work with the modern pages and the new Library and List experience. More info on this huge gap can be found in this post.

I hope that this was helpful!

Monday 14 November 2016

Trust failed error when browsing the Central Administration

In this quick post I am going to share an issue that I recently hit with one SharePoint Server deployment. While browsing the Central Administration I got below error when clicking on the Manage service applications page.


The key thing with this error is to know the background story, something I was missing.
The story is that this farm was migrated from one domain to another.
Everything was working fine the new farm was in production when we started to get this error.
There was one small detail that we were not aware of and it is that there was domain trust between the new and the old domain during the migration. This is why everithing was working fine until the network link between the old and the new domain was cut.
With this small detail the error below started to make sense. You will see this error in different .NET apps if the app is trying to do something with identity from a trusted domain but no domain controller from the trusted domain can be reached.

The trust relationship between the primary domain and the trusted domain failed.

By looking at the "Delegated Administrators" I concluded that there are accounts from the old domain that have permissions over some of the service applications. I was even unable to get the service applications using Get-SPServiceApplication in powershell. It seems that there is some identity checking when we access the service application management page and it is failing because the trusted domain cannot be reached. The same exception can be reproduced if you try to translate username from the trusted domain to SID. The lines below are a good test to check if there is an issue with the trusted domain with PowerShell.

$userName = "DOMAIN\User"
$objUser = New-Object System.Security.Principal.NTAccount($userName)
$strSID = $objUser.Translate([System.Security.Principal.SecurityIdentifier])
$strSID.Value

Here are some of the things that might not work if you are in this situation:

- You will not be able to access the service management page
- You will not be able to enumerate the service applications in powershell
- In my case the Search and UPA was the SAs with administrators from the trusted domain and you will not be able to restart the service instances
- The UPA might stop working working completely
- If you clear the configuration cache the Timer Service will fall in a loop of rebuild attempts and crashes and no timer jobs will be executed.

As you can see this situation might not be a good place to be :).
The solution to this will be to restore the connection to the trusted domain and I am talking about a physical availability to a DC from the trusted domain or just remove the trust from the current domain. Sometimes the second solution might be the only possible solution, or just maybe this relationship was just not removed by the domain admins when the connection was cut.
If you remove the domain trust the error will be fixed and the translate method in powershell will fail with "Some or all identity references could not be translated." which it seems is handled better. Than you will be able to do some proper cleanup, if you wish.
I hope that this post was helpful! 

Tuesday 8 November 2016

Run PowerShell script on Windows 10 PC through the MDM Channel in Intune

In the last couple of weeks I've been working on an internal project that includes software distribution of Windows apps on MDM enrolled Windows 10 PCs using cloud only Intune deployment. Yes that's right, no SharePoint in this post, but a real world EMS story.
The easiest way to publish classic windows apps on Windows 10 PC that is MDM enrolled will be by publishing Windows Installer through MDM (*.msi) installer.
The important thing with this installer type is that the installation should go without any user interaction required especially when you use "Required Install".
The issue I hit is related to Dell software that is essential for the remote work and almost everyone in the company is using it. However for some reason the software publisher (Dell Software) is considered not trusted in Windows 10. There is this great thing in Windows (since Win 7) called SmartScreen that will pop-up a question asking if we trust the software publisher, before running executable with not trusted publisher. If we manually install the software we are clicking Yes and everithing is fine, the signing certificate is added to the Trusted Publishers certificate store.
However, when we are deploying the package over Intune this issue will cause the installation to fail with exit code 1603.
The way to fix this is to extract the signing certificate and install it in the Trusted Publisher on the target computer or to turn off SmartScreen with a policy, but the second is not a good security practice. The issue is that we cannot deploy cert to the Trusted Publishers store using Intune configuration policy.
My solution is to use PowerShell script that will be deployed and executed over the MDM channel.
The issue is that Intune does not support direct script deployment. There are some articles on the net that are demonstrating how to package batch script in self-extracting executable using IExpress.
However we need to wrap PowerShell script in MSI package suitable for MDM deployment.
I think that this is a very useful technique and I will try to put all the peaces together in this post, so you can deploy and run every PowerShell script on Windows 10 MDM PCs.
The easiest(and free) way to do this will be to create a self-extracting exe with IExpress, wrap the exe in MSI and publish it to Intune.
In order to reliably wrap the PS script in exe I used a script that I found in the TechNet Gallery called Create-EXEFrom.ps1. It will do a really good job wrapping the PS script and you can also add additional files in the package, like in my case I will need Dell Software certificate that should be installed on the target machine. Below is an example line for wrapping MyApp.ps1 script (this will be name used in all sample code) including the certificate we need.

.\Create-EXEFrom.ps1 -PSScriptPath "C:\MyApp.ps1" -SupplementalFilePaths "C:\Certificate.cer"


The exe will be created in the same folder and will be called "MyApp.exe".
The tricky part is that our exe and msi package should also be executed without any interaction required, including bypassing of the SmartScreen. This can be done by properly signing both packages with valid code signing certificate. In my case I have used the certificate that we normally use in bluesource for signing mobile apps. In order to sign the packages you can use the signtool.
If the signing is successful you should see below in your file properties and you should be able to run the exe without SmartScreen alerts.
Publisher Certificate

Now when we have signed exe we should wrap it in MSI package.
The easiest free way for me was to use WiX Toolset to do that. I put together really simple WiX project with only one custom action that will execute the exe. Below you can see the sample xml with the cmd commands I used to compile the WiX project.
If you are new to WiX  you should have your WiX bin folder in the PATH variable to make the cmd script work as it is. In my case it is "C:\Program Files (x86)\WiX Toolset v3.10\bin"(I know it is not the newest version).
Note that the package will be installed under the SYSTEM account and you should consider that in your scripts. You can find how to test MSI package in following article.
Next step is to publish the MSI as "Windows Installer through MDM (*.msi)" installer type as it is shown below.
Intune Publish MSI

The last thing that's left is to deploy the newly published app and maybe running some tests won't be a bad idea :).

I hope that this non-SharePoint post, written by a SharePoint guy will be helpful!

Friday 14 October 2016

Build slider bar graph date time search refiner with custom intervals

A couple of weeks ago I worked with a client that had this requirement for their search center in SharePoint Online. They had a repository with different research documents and these documents had a Publishing Date date/time field with values up to 30 years ago.
The client wanted to build a result page for this documents and have a slider bar refiner with custom intervals up to 10 years ago. 
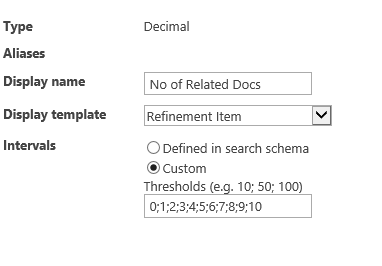
If we have a numeric based managed property we can specify a custom refiner interval like the one below.
Unfortunately the Custom option is missing for date and time datatype. We have predefined intervals that are up to one year ago and "Defined in search schema" which I am not sure what is suppose to mean, but this will be the error you will get if you select this option.

For this Display Template you must specify custom intervals for the values that will be shown. Please change the refinement settings to use custom intervals.

It really does not tell us much if you don't have an option to specify custom interval in the UI.
Luckily if  you export the Refinement webpart you can see more refiner settings. All selected refiners are represented as JSON and below are the settings of our Publication Date refiner(formatted).


There are two settings that grab the attention and they are highlighted in the picture above. They are "useDefaultDateIntervals", which obviously means if the default intervals that cover only one year should be used and "intervals" that should represent the custom intervals. After some research on the web I found that the intervals value should be array of integers that are representing the intervals in days. I came up with these intervals for my client: Ten Years Ago, Five Years Ago, Three Years Ago, One Year Ago, Six Months Ago, Three Months Ago, One Month Ago, 7 days Ago and Today. This will be set with flowing intervals value:

[-3650,-1825,-1095,-365,-180,-90,-30,-7,0]

The first step will be to update the values for "useDefaultDateIntervals" and "intervals". Set the "useDefaultDateIntervals" to false and for "intervals" use your interval array like the picture below.


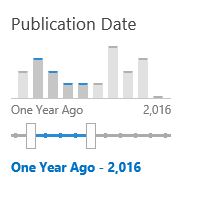
Then you will need to import the webpart  and use it in your page. The result is below.


We have our custom intervals and they are working as we expect(at least with me). However we can see one big issue and it is that the intervals are not labeled appropriately. This should be fixed in the refiner display template.
As it is not a good practice or practical in this case to edit the out of the box display template I created a new display template based on the out of the box "Slider with bar graph".
In the new template I have specified values for the Label and the NextIntervalLabel of all "filter boundaries". In this example we are going to have 10 boundaries. NextIntervalLabel is used when you move the mouse over the bar and the Label is used for boundary label in the slider. You can see the entire template below.

On line 104 we can see how to get all boundaries and their values for Label and NextIntervalLabel.
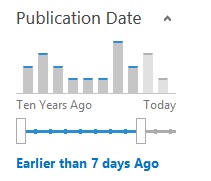
After deploying and setting the new display template we can see that the labels are much more accurate.


There is small detail that should be updated and it is the start and end labels of the bar graph.
Unfortunately my solution to that is to change the text by selecting the elements by class name and this is not the most elegant solution if you have more than one slider bar refiners, in that case you will need to change the index number to get the correct elements. You can see the code below.

With this final touch this is how our custom slider bar graph refiner looks like.


It looks really cool and useful. If you check the refiner settings in the UI now you will see that "Defined in search schema" is selected. I found this misleading since I have done nothing special in the search schema.
I hope that this was helpful!

Tuesday 6 September 2016

Set Managed Metadata field value with PowerShell and CSOM

In the previous post I demonstrated an easy way to migrate managed metadata term store objects to SharePoint Online with PowerShell.
Now when you have migrated the terms you might need to migrate some documents and set the metadata fields in SharePoint Online. In the same project I had to migrate around 600 documents to SPO including the metadata which had 6 managed metadata fields, 4 of them were multi-valued.
In this post I will share a powershell snipped to make TaxonomyFieldValueCollection and use it as value for field of type Managed Metadata.
I am showing this method because I got some mixed results when I used simple string as value. It is hard for me to explain why simply updating with taxonomy string did not worked in all cases.
For example, if the document was created in Office Web Apps I was unable to set the fields using a simple string. You can try using the string method and then cross-check  if everithing is set, because if you feed only metadata string(multi-valued) or just guid(for single-valued) you might not get any error, but the field will be left blank.
The challenge for me in the "TaxonomyFieldValueCollection" approach was to create TaxonomyField object instance, because I had to use the generic client context method CastTo and PowerShell don't work well with generic methods. This is why I decided it is worth sharing this example. You can see the code below.

Now a couple of words about the string that is used. In the example above I am setting multi-valued MM field with collection of two terms. The string is in format "<int>;#<label>|<guid> " with ;# delimiter between the terms. The integer is the item id of the term in the Taxonomy Hidden List, if you are using the term for first time or you do not know this id you can use the default value "-1".
The label part speaks for itself, this is the label of the term and the most important part is the guid of the term. If something is wrong with the format of the string you will see below error message.

"The given value for a taxonomy field was not formatted in the required <int>;#<label>|<guid> format."


This method is working every time for all items. I hope that this was helpful!